
Capture TCP Traffic
Before you read this article, Programing with pcap.
Dump binary data
I wrote some methods to help me observer the result form memory, all these thing better to print in friendly hexadecimal.
00000000:   8A 17 03 03  00 5D 00 00  00 00 00 00  00 BD 2E 02    .....]..........
00000020:   94 FE 87 9F  2B 5E 57 F9  5E 95 F9 76  3F 2C 02 A0    ....+^W.^..v?,..
00000040:   66 66 38 3E  03 B5 FD 2C  BB 6C 9F 87  39 30 3A B4    ff8>...,.l..90:.
00000060:   A4 E5 82 80  BF 02 97 C6  2C C6 52 1B  20 3A F7 C9    ........,.R. :..
00000080:   47 A0 A6 E4  B4 FA 62 40  3A B6 32 1E  DB 7B 12 CC    G.....b@:.2..{..
000000A0:   A6 34 1C 92  67 C3 4D 7E  5E 87 79 AE  37 50 E8 A1    .4..g.M~^.y.7P..
000000C0:   08 62                                                 .b
It's pretty cool, right?
Methods to print binary like above
#include <stdio.h>
#include <stdlib.h>
#include <pcap.h>
#include <string.h>
#include <time.h>
#include <netinet/in.h>
#include <netinet/if_ether.h>

#define LENGTH_BUFFER 255
#define LENGTH_HEX 62
#define LENGTH_CHAR 16
#define LENGTH_ADDRESS 8

#define u_char unsigned char

//Padding characters
char *repeat(char ch, size_t times)
{
  char *str = (char *)malloc(times + 1);
  memset(str, ch, times);
  str[times] = 0x00;
  return str;
}

//Render address
char *address(size_t s)
{
  char buffer[LENGTH_ADDRESS + 1];
  sprintf(buffer, "%X", s);
  char *tmpPadding = repeat('0', LENGTH_ADDRESS - strlen(buffer));
  strcat(tmpPadding, buffer);
  return tmpPadding;
}

//Binary print
void brintf(void *data, size_t offset, size_t len)
{
  int i = 0;
  size_t s = 0;
  char *dataPointer = (char *)(data + offset);
  char buffer[LENGTH_BUFFER];
  char charBuffer[LENGTH_BUFFER];
  char hexBuffer[3];
  unsigned char tmp;

  //Print address to buffer
  {
    char *strAddress = address(s);
    sprintf(buffer, "%s: ", strAddress);
    free(strAddress);
  }
  //Clearn character buffer
  memset(charBuffer, 0x00, LENGTH_BUFFER);

  for (int c = 0; c < len; c++)
  {
    // AND with 0xff to make sure we have pure char
    tmp = 0xff & dataPointer[c];
    sprintf(hexBuffer, "%X", tmp);
    //Only show printable
    charBuffer[i++] = (tmp >= 32 && tmp <= 126) ? tmp : '.';
    if (strlen(hexBuffer) == 1)
    {
      hexBuffer[1] = hexBuffer[0];
      hexBuffer[0] = '0';
    }
    strcat(buffer, " ");
    if ((i - 1) % 4 == 0)
    {
      strcat(buffer, " ");
    }
    strcat(buffer, hexBuffer);
    size_t bl = strlen(buffer);
    if (bl >= LENGTH_HEX || c == len - 1)
    {
      i = 0;
      s += 32;
      if (bl < LENGTH_HEX)
      {
        char *tmpBuffer = repeat(' ', LENGTH_HEX - bl);
        strcat(buffer, tmpBuffer);
        free(tmpBuffer);
      }
      printf("%s    %s\n", buffer, charBuffer);
      {
        char *strAddress = address(s);
        sprintf(buffer, "%s: ", strAddress);
        free(strAddress);
      }
      memset(charBuffer, 0x00, LENGTH_BUFFER);
    }
  }
}
brintf takes three argurments:
void brintf(void *data, size_t offset, size_t len);
data: data pointeroffset: offset of beginning of datalen: data size
Write capture code:
void packet_handler(
    u_char *args,
    const struct pcap_pkthdr *header,
    const u_char *packet);

int main(int argc, char *argv[])
{
  char *device;
  pcap_if_t *alldevs;
  char error_buffer[PCAP_ERRBUF_SIZE];
  pcap_t *handle;
  struct bpf_program fp;     // The compiled filter
  char filter_exp[] = "tcp"; // The filter expression, apply to all TCP
  bpf_u_int32 mask;          // Our netmask
  bpf_u_int32 net;           // Our IP
  int timeout_limit = 10000; // In milliseconds

  // Retrieve the device list from the local machine
  if (pcap_findalldevs(&alldevs, error_buffer) == -1)
  {
    fprintf(stderr, "Error in pcap_findalldevs: %s\n", error_buffer);
    return 1;
  }

  if (alldevs == NULL)
  {
    fprintf(stderr, "No device found: %s\n", error_buffer);
    return 2;
  }

  //Seet device as first device found
  device = alldevs->name;

  // Find the properties for the device
  if (pcap_lookupnet(device, &net, &mask, error_buffer) == -1)
  {
    fprintf(stderr, "Couldn't get netmask for device %s: %s\n", device, error_buffer);
    net = 0;
    mask = 0;
  }

  // Open device for live capture
  handle = pcap_open_live(
      device,
      BUFSIZ,
      0,
      timeout_limit,
      error_buffer);
  if (handle == NULL)
  {
    fprintf(stderr, "Could not open device %s: %s\n", device, error_buffer);
    return 3;
  }

  // Compile and apply the filter
  if (pcap_compile(handle, &fp, filter_exp, 0, net) == -1)
  {
    fprintf(stderr, "Couldn't parse filter %s: %s\n", filter_exp, pcap_geterr(handle));
    return 4;
  }

  // Set filter
  if (pcap_setfilter(handle, &fp) == -1)
  {
    fprintf(stderr, "Couldn't install filter %s: %s\n", filter_exp, pcap_geterr(handle));
    return 5;
  }

  pcap_loop(handle, 0, packet_handler, NULL);

  return 0;
}

void packet_handler(
    u_char *args,
    const struct pcap_pkthdr *packet_header,
    const u_char *packet_body)
{
  //Make sure it's TCP/IP
  if (packet_header->len > 66)
  {
    printf("\n");
    //Print TCP payload
    brintf((void *)packet_body, 65, packet_header->len - 66);
  }
  return;
}
Compile and execute:
gcc ./main.c -lpcap -o ./main && sudo ./main
Result:
00000000:   50 66 4C F0  3A C5 EB C9  57 55 3E 63  07 3D 6A 9F    PfL.:...WU>c.=j.
00000020:   A1 0B E0 31  F8 4D 43 D3  ED 5B F7 A7  4B 81 8E 5D    ...1.MC..[..K..]
00000040:   58 95 7D 91  24 AF 1B 57  CD 3E 50 5B  48 9B BF 77    X.}.$..W.>P[H..w
00000060:   E3 EA 9F 1E  49 01 3F 54  25 1B F8 F1  15 62 10 C5    ....I.?T%....b..
00000080:   D9 61 F0 1F  2B A2 58 E2  AC B8 69 E2  1B E2 08 CF    .a..+.X...i.....
000000A0:   BB 08 E8 6D  82 5F 6D F6  2B 5E 98 1D  D3 65 66 10    ...m._m.+^...ef.
000000C0:   D4 65 DD B5  36 14 25 23  1F 84 27 A5  8B 3A 39 AF    .e..6.%#..'..:9.
000000E0:   94 47 71 F6  73 EC B2 D7  5C CB 16 A7  07 AA 02 39    .Gq.s...\......9
00000100:   48 04 38 FD  E5 C4 22 B9  CA E5 FB D3  DA 8E A3 97    H.8...".........
00000120:   10 6A 7B 16  81 F3 54 C5  43 CF 72 A6  EC F2 7A 12    .j{...T.C.r...z.
00000140:   D1 14 23 9B  DC 5B 80 AA  62 01 1A CD  03 B3 CB F8    ..#..[..b.......
00000160:   2E BB 78 82  38 88 DD 9B  8A 18 21 D0  6E 53 9D 78    ..x.8.....!.nS.x
00000180:   91 8F A0 D8  76 ED D4 6E  4B 53 E4 58  09 74 1D 9A    ....v..nKS.X.t..
000001A0:   3A 0B F0 EF  E5 76 CD AF                              :....v..

00000000:   56 17 03 03  01 36 00 00  00 00 00 00  00 01 5B F2    V....6........[.
00000020:   6B 16 E8 56  CB C5 59 73  54 41 5F 17  93 00 0C BF    k..V..YsTA_.....
00000040:   72 83 DB 5F  7C CE DF F0  C8 C8 7D 2F  22 9B 43 77    r.._|.....}/".Cw
00000060:   74 AE A2 77  7D B2 B7 03  AE 63 62 7A  63 27 9B 69    t..w}....cbzc'.i
00000080:   15 FB 69 95  97 76 CC 98  4B 7F 8E FC  B5 46 ED 9A    ..i..v..K....F..
000000A0:   59 88 65 29  7D D7 F7 4D  C2 0E D2 B3  D4 3B 70 BF    Y.e)}..M.....;p.
000000C0:   AB 6B 33 82  70 A1 3E 53  CF 48 2D EE  47 E6 D4 D6    .k3.p.>S.H-.G...
000000E0:   E4 D2 26 07  F4 E0 82 A7  AE 96 2F 6F  A8 E0 CE C3    ..&......./o....
00000100:   C7 74 3B C1  27 8A A1 00  22 58 11 05  1E 6B 07 A7    .t;.'..."X...k..
00000120:   0E 63 D6 AC  C4 E0 66 F0  88 48 FD 1D  63 8D 11 80    .c....f..H..c...
00000140:   00 5F 9D 9E  03 A1 98 A1  E8 BF 81 5F  54 1B 10 04    ._........._T...
00000160:   08 2B FA ED  7D 10 A7 64  F3 E3 EC 64  C3 BE 69 E8    .+..}..d...d..i.
00000180:   6F 98 81 A5  39 86 A4 C9  FE 21 45 73  0A 46 17 51    o...9....!Es.F.Q
000001A0:   EA AC 10 4A  09 CD 8E DD  7F DF AF BE  C3 1F AA 9A    ...J............
000001C0:   EE 63 C2 3F  0F 43 FA 5A  53 F4 EA D1  7E 8A 6D 0B    .c.?.C.ZS...~.m.
000001E0:   11 C8 A6 FC  F1 F6 BC 95  05 2C 3C 25  27 22 CD 27    .........,<%'".'
00000200:   F9 82 99 70  3E 00 86 80  1F 24 B4 63  E9 CF 93 30    ...p>....$.c...0
00000220:   1A 60 5A 94  B3 83 22 EB  F3 60 98 24  54 8F FB 94    .`Z..."..`.$T...
00000240:   3E 00 DB 0E  85 B4 3F 56  55 34 2C C1  44 DD E8 9E    >.....?VU4,.D...
00000260:   09 A1 5C DB  BD 24 EF 9E  0C ED 4B                    ..\..$....K
Implement Singleton đúng trong TypeScript
Một thanh niên viết bài hướng dẫn code JavaScript và TypeScript trên Medium. Mình đọc thấy bài viết sai hơn quá nửa, vậy mà cũng có 8K claps. Mình tự hỏi, mình đéo phải là ngu lắm rồi sao?, giờ lòi đâu ra 8K súc vật này?. Thậm chí thằng viết còn đéo thể phân biệt được cách define một object là static hay dynamic trong JavaScript. Nên mình chỉ xin mạn phép viết lại đoạn sai nhất trong bài.
Singleton
Singleton thì không phải nói nhiều, nó được dùng để đảm bảo performance giảm resource để cấp và khởi tạo các dynamic object. Singleton được dùng khi một object được dùng đi dùng lại nhiều lần, cho cùng một mục đích. Singleton có thể xem là vừa có ưu thế của static và dynamic object. Singleton được viết nhiều dùng nhiều mình chỉ dùng chung ý tưởng đó nhưng implement riêng cho TypeScript.
// Need to cache all dynamic instance
const instanceCache: { [key: string]: any } = {};

export function Singleton<T>(
  instanceName: string,
  Constructor: new (...params: any[]) => T,
  ...constructorParams: any[]
): T {
  if (typeof instanceCache[instanceName] === 'undefined') {
    // Construct new instance with given params
    instanceCache[instanceName] = new Constructor(...constructorParams);
  }
  return instanceCache[instanceName];
}

export default Singleton;
Code trên chỉ là cache lại dynamic instance vào một static object, thay vì chỉ dùng được cho một loại constructor thì nó sẽ support cho nhiều loại constructor. Tiếp theo mình viết một example class để test Singleton.
import { Singleton } from './singleton';

export default class TestClass {
  private name: string;

  private time: Date;

  constructor(name: string) {
    this.name = name;
    this.time = new Date();
  }

  public print() {
    process.stdout.write(`${this.name} - ${this.time.toLocaleString()}\n`);
  }

  public static getInstance(): TestClass {
    return Singleton<TestClass>('test-class-singleton', TestClass, 'Thanos');
  }
}
public static getInstance(): TestClass là điểm đáng quan tâm ở đây, còn lại thì TestClass được định nghĩa hoàn toàn bình thường. Đây là cách mình viết main code:
import TestClass from './testclass';

const classInstance = TestClass.getInstance();

// Print class's data
classInstance.print();

// Just to make sure it's singleton
setTimeout(() => {
  TestClass.getInstance().print();
}, 10000);
Kết quả:
Thanos - 11/28/2020, 10:00:07 AM
Thanos - 11/28/2020, 10:00:07 AM
Mình có cẩn thận thêm cái setTimeout() để chắc là constructor() chỉ được gọi một lần duy nhất. Bạn có thể đọc code, tự suy nghĩ, tự improve nó cho nó hay hơn. Hoặc viết một bài phân tích cái ngu của bài này.
Đừng tin bất cứ thứ gì trên Internet, bài viết này cũng vậy. Bạn có não mà!.
Run go Ethereum inside a docker container as non-root user
I do serveral experiments on Ethereum blockchain it's really fun to play around. Sometime, you want to have a few decentralized features then you supposed to run your own node instead of Infura endpoint. This article is also a experiment to have fun with Ethereum and docker container.
Docker compose
docker-compose.yml is quite familiar to start a docker project.
version: "3.7"
services:
  geth:
    image: my-geth:latest
    build:
      context: .
      dockerfile: Dockerfile
    user: "smart-ass"
    volumes:
      - ./data/:/home/smart-ass/data/:rw
In this configuration, I'm going to map my current directory ./data/ into /home/smart-ass/data, just want to make sure I won't lost my synchronization even I start a new container.
Writing a script to start docker-compose
This script will create a user named smart-ass belong to smart-ass group and passed arguments from host to the container.
#!/usr/bin/env sh

PARENT_USER=smart-ass
PARENT_UID=1988
PARENT_GROUP=smart-ass
PARENT_GID=1988

# Creating smart ass user and group
getent group smart-ass
if [ $? -eq 2 ]; then
    sudo groupadd -g 1988 smart-ass
    sudo useradd -M -g smart-ass -u 1988 smart-ass
fi

# Create folder if not existed
if [ ! -d "./data/" ]; then
  sudo mkdir ./data/
fi

# Changing owner ship of data folder
sudo chown ${PARENT_USER}:${PARENT_GROUP} -R ./data/
sudo chmod 755 -R ./data/

# Start docker build with argument
sudo docker-compose build \
    --build-arg PARENT_USER=${PARENT_USER} \
    --build-arg PARENT_UID=${PARENT_UID} \
    --build-arg PARENT_GROUP=${PARENT_GROUP} \
    --build-arg PARENT_GID=${PARENT_GID}
User's id and group's id were specified as a unique number 1988. Let's take a look inside Dockerfile
Dockerfile
Alpine Linux is good choice to begin with, geth is also supported by default that's make my job easier.
FROM alpine:latest

# Consumed agurments from host machine
ARG PARENT_USER
ARG PARENT_UID
ARG PARENT_GROUP
ARG PARENT_GID

# Define home folder
ENV HOME=/home/${PARENT_USER}

# Install geth
# Add `smart-ass` group
# Add `smart-ass` user
# UID and GID is the same to host machine, we just want to make sure host's data is accessible to container's user
RUN apk add geth \
    && addgroup -g ${PARENT_GID} ${PARENT_GROUP} \
    && adduser -D -u ${PARENT_UID} -G ${PARENT_GROUP} -h ${HOME} ${PARENT_USER}

WORKDIR ${HOME}

COPY ./docker-script.sh ./docker-script.sh

RUN chown ${PARENT_USER}:${PARENT_USER} ./docker-script.sh \
    && chmod a+x ./docker-script.sh

USER ${PARENT_USER}

# Is required to discover ethereum nodes
EXPOSE 30303/tcp 30303/udp

CMD ["./docker-script.sh"]
The golden rule is, "don't run with root privilege".
Startup command
I want to run serveral commands during container boot up so I created ./docker-script.sh:
#!/usr/bin/env sh

container_info=`id`
echo "Container info: ${container_info}"
echo "Test write to data folder:"
ls -la ${HOME}/data/
date > ${HOME}/data/test-write.txt
cat ${HOME}/data/test-write.txt
geth --datadir ${HOME}/data --rinkeby --syncmode "light"
Rundocker without docker-compose
docker run -v $(pwd)/data/:/home/smart-ass/data -ti --rm my-geth:latest
Conclusion
- The golden rule is, "don't run with root privilege".
- Docker container was started with non-root user
./data/geth.ipcwas accessible from inside and outside of docker container.- IPCProvider is providing impresive performance
- You could run with current user by changing these lines:
PARENT_USER=$(id -u)
PARENT_UID=$(id -nu ${PARENT_USER})
PARENT_GROUP=$(id -ng ${PARENT_USER})
PARENT_GID=$(id -g ${PARENT_USER})
Làm thế nào để contribute đúng trên GitHub
Phần lớn lập trình viên sẽ dành thời gian học tập trên hai trang nổi tiếng PornHub và GitHub. Tuy không có nhiều tư liệu bắt mắt nhưng GitHub host một lượng lớn các project open-source. Contribution sẽ là một nhu cầu tất yếu, nhưng contribute như thế nào để mọi người đều vui vẻ là câu chuyện dài với newbee.
Giới thiệu
Việc dành thời gian để contribute cho các project open-source không hẳn là vô bổ nó giúp chúng ta hoàn thiện kỹ năng cũng như học thêm về working flow của các nhóm open-source khác nhau, từ đó improve bản thân để đạt được những milestone lớn hơn. Thậm chí với chút ít may mắn các bạn có thể được các công ty để mắt và đưa ra những offer hấp dẫn.
Tôi là ai đây là đâu?
Đây là tâm lý chung của một thanh niên mới tạo account GitHub, cảm giác khá là khó hiểu khi đang hình dung xem “Wtf is happening over there?”. Sau thời gian làm quen và sử dụng GitHub thấy và project hay hay, mỗi chúng ta sẽ có ý định contribute code của mình cho các project đó.
Nhưng mọi chuyện đâu như là mơ, rào cản thứ nhất là không hiểu rõ cấu trúc project, rào cản thứ hai là ngôn ngữ, rào cản thứ ba là không quen ai, rào cản thứ tư là code sai standard hoặc sai yêu cần từ bên nhận pull request. Vậy là thay vì được chào đón, newbee bị tổng sỉ vã, chửi bới các kiểu. Điều này đôi lúc làm tổn thương và gây ra nhiều dạng ức chế và trầm cảm.
Họ có quá toxic không?
Sau khi pull request bị reject thì đôi khi lại tạo ra cảm giác tức tối, thậm chí người reject pull request của bạn có khi code cũng chẳng hay lắm. Nhưng cách nói chuyện thì toxic vãi. Thật ra không phải mọi người nhận pull request đều toxic, chỉ là một phần khá đông mà bạn xui xẻo gặp phải. Hoặc do bạn chưa đọc kỹ CONTRIBUTOR guide. Thường các project lớn sẽ có riêng một phần để hướng dẫn bạn tạo một pull request đảm bảo đúng tiêu chuẩn của họ.
Bắt đầu như thế nào
1. Git model của họ là gì? có quy định in-house nào về naming không?
a. Merge hay rebase?
Đây là điều bạn nên thuận trọng, team của họ có thể sẽ prefer rebase thay vì merge. Nên việc tạo pull request kèm theo một đống merge chằng chéo giữa các branches chẳng khác nào tát vào mặt họ. Một team lead nói với mình, “Bọn tao prefer rebase bởi gì nó cho một history liên tục và đẹp hơn.”. Mỗi team có lý do riêng nên nếu bạn tôn trọng họ thì bạn sẽ được tôn trọng.
Có một số nhóm khác thì prefer merge, các nhóm perfer merge chủ yếu chỉ quan tâm tới việc làm sao để các features được phát triển song song chứ cũng không cần hình thức lắm. Nhưng tất nhiên cũng có một số luật như, đừng bao giờ merge master vào develop… Những luật này hình thành trong quá trình development hoặc do team đó tự quy định bạn cần phải đọc.
b. Họ có tạo branch cho mỗi feature không?
Cái này tùy thuộc team, nhưng điều bạn cần làm là dùng chức năng visualization để xem git graph. Nó sẽ cho bạn thấy sự phát triển của các branch như thế nào, đâu là branch chính. Có prefix cho branch hay không?.
Chẳng hạn có nhiều team có quy định cho branch như sau:
Feature sẽ bắt đầu với feature/ và tiếp theo sau là tên feature với underscore thay cho space.
Ví dụ: feature/new_login_form
Và cứ như vậy chúng ta có bug/, hotfix/, misc/… tùy theo mục đích và sự cần thiết
c. Họ có quy định đặt commit message không?
Có rất nhiều team có quy định về commit message rất chặt chẽ, như phải có prefix [feature], [fix], [document]… Tuy nhiên có một số team lại có nhiều yêu cầu kỳ cục như: tất cả đều phải là chữ thường, và chia ở thì hiện tại đơn.
Chẳng hạn thay vì: imrpoving validator's methods phải là improve validator's methods
Ngoài ra còn có những quy tắc khác như kèm theo task id hoặc issue number.
Ví dụ: #23 improve validator's methods
Hoặc một số team màu mè hơn như sau:
[Improve] validator's methods #23
Bạn cần xerm git log để xem team đang dùng format nào và dùng cho phù hợp
Và nếu cảm thấy muốn nắm rõ hơn hãy đọc quyển này Pro Git.
d. Họ có thiết lập automation cho project không?
Một số repo có thiết lập automation trong phần project nên khi bạn tạo một pull request giải quyết issue #23 chẳng hạn. Người ta sẽ cần bạn thêm nội dung sau trong pull request:
Ví dụ:
Title:
Improve validator's method

Description:
This pull request is enhancing validation, resolve: #23
Ngoài resolve thì nó có thể là close #23, fix #23… bạn dọc thêm ở đây.
Để đọc về các thiết lập automation cho project ở đây.
e. Họ có git hook không?
Nhiều project mình biết thì thường thêm git hook vào để kiểm tra code coverage, thực thi test, kiểm tra commit message… Việc bạn nên làm khi có githook là hãy để im nó làm việc của nó. Việc bạn sữ dụng git commit --no-verify là một việc làm khó có thể chấp nhận được.
2. Chú ý về CI/CD
CI/CD giúp ích rất nhiều trong development cũng như đảm bảo deliver features đúng hẹn. Phần lớn các team đều có các phần để integrate với travis-ci, circle-ci… nên bạn cần xem liệu mình có cần thêm các thiết lập này để code của bạn hoạt động trên các môi trường của travis or cricle không.
a. Code của bạn có pass test cases không?
Thường thì các project đều có test suite và rất nhiều test cases để đảm bảo code quality. Do đó khi bạn thực hiện bug fix thì điều quan trọng là bạn phải pass mọi test cases. Còn trường hợp bạn thêm feature mới thì bạn phải thêm test cases cho features đó. Nó gần như là luật bất thành văn rồi.
b. Code của bạn có giảm code coverage không?
Code coverage có thể nói là một tiêu chí để đánh giá xem bao nhiêu bug đã được mặc áo đẹp. Các project với chỉ số coverage càng cao thì có thể nói là độ tin cậy của code càng cao. Vì phần lớn code đã pass qua các test cases. Nên khi pull request của bạn làm giảm code coverage thì không ai muốn merge nó cả.
3. Hiểu project và trade-off
Có một số project họ đã chấp nhận code đó là trade-off thì bạn cũng không nên cố chấp sửa nó làm gì. Vì họ cũng đã cân nhắc kha khá, nên thường các pull request đụng vào dạng code này thì ít khi được merge trừ khi nó xuất sắc.
Tạm kết
Bài viết không dài không ngắn, mình mong các bạn tìm ra được một điều gì đó hữu ích cho bản thân và cùng cho đi nhiều hơn. Nếu bài viết này có chỗ chưa thỏa đáng hoặc sai lỗi chính tả thì các bạn nhẹ tay dùm.
XorShift based pseudo random
This paper Xorshift RNGs, July 2003, Marsaglia, George was inspired me to create another kind of Xorshift based without static initial.
The basic concept is:
- Seeding with a initial value
seed - Repeat caculation for every bit of
seed iis denoted for biti th- Read
shift flagby take less significant bitRSHIFT(seed, i) AND 1 - If
shift flagequal to0:result = result ^ RSHIFT(seed, i) - If
shift flagequal to1:result = result ^ LSHIFT(seed, i)
Implementation
Implement in Python
import random

seed = random.randint(0x55555555, 0xffffffff)


def rnd():
    global seed
    x = 0
    for i in range(32):
        if (seed >> i) & 1:
            x ^= seed >> i
        else:
            x ^= seed << i
    x = 0xffffffff & x
    seed = x
    return x


for i in range(1000):
    print rnd()
Implement in JavaScript:
const crypto = require('crypto');

//Generate seed randomBytes
var seed = crypto.randomBytes(4).readUInt32LE(0);

//XorShift based PRNG
function rnd(){
    var x = 0, i;
    for(i = 0; i < 32; i++){
        //Shift right if [i th] bit is equal to 1, otherwise shift letf
        x ^= ((seed >> i) & 1) ? seed >> i : seed << i;
    }
    return seed = x >>> 0;
}

for(let i = 0; i < 1000; i++){
  process.stdout.write(`${i}\n`)
}
Implement in C
#include <stdio.h>
#include <time.h>

unsigned int seed;

unsigned int rnd(){
    unsigned int x = 0, i;
    for(i = 0; i < 32; i++){
        x ^= ((seed >> i) & 1) ? seed >> i : seed << i;
    }
    return seed = x;
}

int main(){
    time_t tsec;
    int i = 0;
    tsec = time(NULL);
    seed = (unsigned int)tsec;
    for(;i < 1000; i++) printf("%u\n", rnd());
    return 0;
}
Test:
gcc test.c -o test && chmod a+x test && ./test
Conclusion
0x00000000and other kind of poor entropy seed are the worst thing to this algorithm- The result is predictable within disclosed
seed - We need some kind of
fallback modefor low entropy seed - It isn't safe for cryptography purpose
Onward in XOR cipher
A long time ago, I had readed this article Unbreakable Cryptography in 5 Minutes. I've realized XOR Cipher is secure as long as key length equal or greater than data length. It's sound stupid where data is fucking big but what if we could generate the key deterministically?.
Hash function
Hash function is some kind of deterministic algorithm, it's always giving the same result for the same input. And you could repeating hash function on the result of itself to get new digest, it won't repeat by sequence.
Proposing a method to generate infinity key length
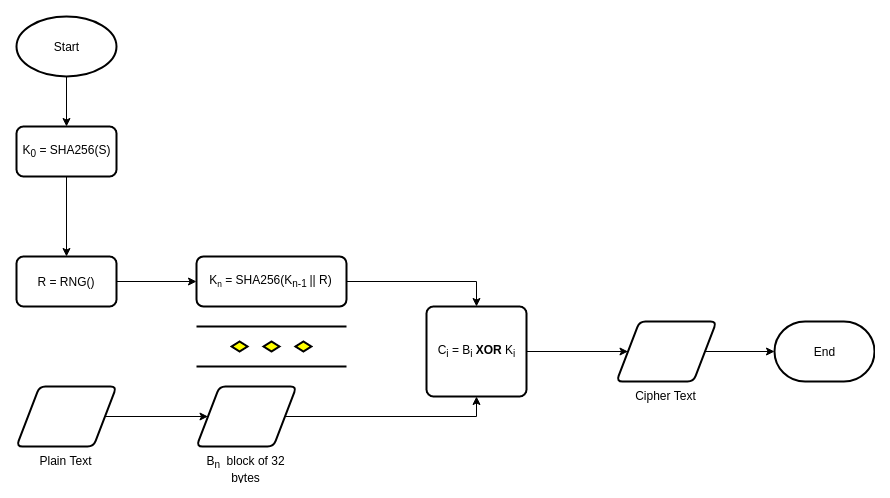
Implementation
Programming with libpcap
libpcap is a good library to capture network traffic, It's fun to programing with libpcap you could do some experiment or deal with lower layer of OSI model. I'm go back to programing with libpcap in the challenge of capture TCP traffic.
Install development environment
I'm using Fedora 29 and have no idea about your Operating System then some might not work.
$ sudo dnf install gcc make cmake libpcap-devel
libpcap-devel is required, of course.
Write first program to listing all device
It's some kind of Hello World! with libpcap.
#include <stdio.h>
#include <pcap.h>

int main()
{
  pcap_if_t *alldevs;
  pcap_if_t *d;
  int i = 0;
  char errbuf[PCAP_ERRBUF_SIZE];

  /* Retrieve the device list from the local machine */
  if (pcap_findalldevs(&alldevs, errbuf) == -1)
  {
    fprintf(stderr, "Error in pcap_findalldevs: %s\n", errbuf);
    return 0;
  }

  /* Print the list */
  for (d = alldevs; d != NULL; d = d->next)
  {
    printf("%d. %s", ++i, d->name);
    if (d->description)
      printf(" (%s)\n", d->description);
    else
      printf(" (No description available)\n");
  }

  if (i == 0)
  {
    printf("\nNo interfaces found! Make sure libPcap is installed.\n");
    return 1;
  }

  /* Free device list */
  pcap_freealldevs(alldevs);
}
Compile and run
It's the same to complie Hello World! but you need to add -lpcap to link libpcap to your program.
gcc ./src/list_devices.c -o ./list_devices -lpcap && ./list_devices
Result:
1. enp3s0 (No description available)
2. lo (No description available)
3. any (Pseudo-device that captures on all interfaces)
4. virbr0 (No description available)
5. bluetooth-monitor (Bluetooth Linux Monitor)
6. nflog (Linux netfilter log (NFLOG) interface)
7. nfqueue (Linux netfilter queue (NFQUEUE) interface)
8. bluetooth0 (Bluetooth adapter number 0)
9. usbmon0 (All USB buses)
10. wlo1 (No description available)
11. usbmon1 (USB bus number 1)
12. usbmon2 (USB bus number 2)
13. virbr0-nic (No description available)
Credits
Thanks to these guys,